LIGHTING
Fill-in-Flash
In the early days of
photography the only source of light was, of course, the sun, so most
photography depended upon long days and good weather.
It is said that Rejlander (1865)
used a cat as a primitive exposure meter: placing the cat where the sitter
should be, he judged by looking at its eyes whether it was worth taking any
photographs or whether his sitter should go home and wait for better times!
The first artificial light
photography can be traced back as far as 1839, when L. Ibbetson used
oxy-hydrogen light (also known as limelight) when photographing microscopic
objects; he made a daguerreotype in five minutes, which, he claimed, would have
taken twenty-five minutes in normal daylight.
Other possibilities were
explored. Nadar, for example, photographed the sewers in Paris, using
battery-operated lighting. (1861–2; Paris, Bib. N.)
Catacombs and sewers
of Paris (1861–2; Paris, Bib. N.).
Later arc lamps were
introduced, but it was not until Van der Weyde, who had a studio in Regent
Street, opened 1877 the first studio lit by electric light. Powered by a
gas-driven dynamo, the light was sufficient to permit exposures of some 2 to 3
seconds for a carte-de-visite. ‘Small-photographs, albumen prints card mounted
sized at 2-1/2 by 4 inches. This presentation method was widely used across
around the world.
Soon a number of studios
started using arc lighting. One advert (by Arthur
Langton, working in Belgravia,
London), boldly proclaims:
"My electric light
installation is perhaps the more powerful in London. Photographs superior to
daylight, Pictures can now be taken in any weather and at any time."
More from Arthur Langton's
advertisement:
Quote: “CAUTION many
photographers advertise 'portraits taken by electric light' but 9 out of 10 do
not possess an electric light, owing to its costliness they use an inferior and
nasty substitute... a pyrotechnic powder which gives off poisonous fumes."
In June 1850 an experiment
conducted by Fox Talbot, probably using static electricity stored in Leyden
jars, was conducted at the Royal Society: a page of The Times was fastened on
to a wheel, which then revolved rapidly. Writing about this the following year
Fox Talbot stated:
"From this experiment the
conclusion is that it is within our power to obtain pictures of all moving
objects.... Providing we have the means of sufficiently illuminating them with
a sudden electric flash."
The object then had been to
arrest fast action. A few years later William Crookes, editor of the
Photographic News (October 1859) was responding to a query put to him on how to
light some caves:
"A...brilliant light...can
be obtained by burning.... Magnesium in oxygen. A piece of magnesium wire held
by one end in the hand, may be lighted at the other extremity by holding it to
a candle... It then burns away of its own accord evolving a light insupportably
brilliant to the unprotected eye...."
That same year Professor Robert
Bunsen (of Bunsen burner fame 1859) was also advocating the use of magnesium.
Alfred Brothers of Manchester took the first portrait using magnesium (22
February 1864); some of the results of his experiments may be found in the
Manchester Museum of Science and Technology.
It was however very expensive
at that time and did not come into general use until there was a dramatic fall
in the cost of magnesium a decade later. This, coupled with the introduction of
dry plates in the 80s soon led to the introduction of magnesium flash lamps.
They all used the same principle: a small amount of this powder would be blown,
using a small rubber pump, through a spirit flame, producing a bright flash
lasting about 1/15s. It also produced much smoke and ash!
Then in the late 1880s it was
discovered that magnesium powder, if mixed with an oxidizing agent such as
potassium chlorate, would ignite with very easily. This led to the introduction
of flash powder. It would be spread on a metal dish the flash powder would be
set off by percussion - sparks from a flint wheel, electrical fuse or just by
applying a taper. However the explosive flash powder could be quite dangerous
if misused. This was not really superseded until the invention of the flashbulb
in the late 1920s.
Early flash photography was not
synchronized. This meant that you had to put a camera on a tripod, open the
shutter, trigger the flash, and close the shutter again - a technique known as
open flash.
Certainly early flash
photography could be a hazardous business. It is said, for example, that Riis,
working during this period, twice managed to set the places he was
photographing on fire!
Basically flash powder is an
explosive, therefore; accidents will happen as they did. Simply grinding the
components was dangerous enough, and a number of photographers died while
either preparing the flash powder or accidentally setting it off.
In the beginning of the 20th
century, the flash powder formula was refined and improvements were made and
the process simpler and safer. The flashes now lasted for 10 ms only, so
subjects no longer closed their eyes during the exposure which helped portrait
photography enormously.
There were still enough
disadvantages to the method, for example, the smoke was still causing trouble,
making studio work quite difficult, so another invention was awaited
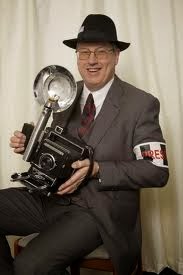
(Left)
5x4 View camera demonstrating the magnesium powder, when mixed with an
oxidizing agent such as potassium chlorate. Right (A 1940s Re-en actor
portraying a civilian press photographer using genuine cameras of the period)
Therefore as we stroll through
the historical time line of photography so too must we look at the development
of the flash gun.
 |
The
'Sashalite'
|
Blue
coating for protection and balanced For daylight
I understand from Brian Wilkinson (PCCGB Member)
that the modern form of Flash Bulb was patented in 1925 by Dr Paul Vierkotter
in Germany, though flash bulbs using magnesium ribbon date back to around 1900.
Wikipedia says "The flash-lamp was invented by Joshua Cohen (a.k.a. Joshua
Lionel Cowen of the Lionel toy train fame) in 1899. It was granted U.S. patent
number 636,492."Amateur Photographer magazine for 10th September 1930 contains a report (page 244) on the 'Sashalite'
flashbulb:
"According
to the 'Morning Post', flash powder is likely to be superseded for photographic
purposes. The British rights in a new invention have been acquired by Mr
Alexander Stewart, a professional photographer carrying on business under the
name of Sasha- hence the word coined for the lamp - 'Sashalite'. (Ilford
Flash)
This
lamp is an oxygen-filled bulb in which aluminium foil is burned, ignition being
accomplished by a 4-volt battery. No details are given as to whether bulbs will
be available for charges of different capacity, but it is clear that no single
charge of foil would be suitable for all conditions and circumstances.
It
is claimed that the light, although powerful, is soft and diffused, less trying
to the eyes than flash powder, and that there is neither noise nor smoke when
the charge is fired. As has been claimed, it will now be possible to take
photographs in circumstances where the use of powder is out of the question-for
example, in coal mines and operating theaters.
The
'Morning Post' published some exclusive photographs, taken with the 'Sashalite'
of the engine-room and other compartments of a submarine. These were not only
interesting as unusual subjects, but they indicated a high technical standard.
The manufacture of the lamps has already commenced, and professional and
commercial photographers particularly will await further information with
considerable interest."
Flash Synchronization
By the late 1930s manufacturers began to incorporate
flash synchronization into their cameras.
My earliest recollection of flash was the blue
cube or bulb as above. ‘I certainly remember these and my granddad telling me
off for touching them’. Initially, these flash bulbs were individual,
disposable items - used once, then discarded.
Ten years on from the First World War, it became the
norm for camera manufacturers to equip flash synchronization to all camera
models. By December 1954. Alternatively, it was possible to fit an attachment
to the cable release socket which fired the shutter and the flashgun together.
 |
3mm coaxial flash synchronisation socket
|
By the mid-1950s the first electronic flash systems
appeared alongside the bulb flash units. Over the next decade, bulb flash was
largely superseded by electronic flash, as electronic flash units became
cheaper, smaller and lighter.
Fast
forward to today:
Each camera manufacturer has an upper limit sync
speed with which flash can be used to expose an image. This said, then using a
slower shutter speed will result in a more pleasing image. Many photographers
operate in this way to tease out the ambient light from the environment and
combine with the flash. This technique is used widely to freeze movement in an
image, however that is a whole topic in its own right, so let us focus on the
aim of FILL FLASH.
Technique:
Flash photography takes on two very basic forms. In
regular flash photography, the flash is the primary light source for the photo.
Flash metering is done for the foreground subject, and the background is
metered by the camera’s regular exposure metering system. This can lead to the
background being underexposed and dark if ambient light conditions are low.
This is how most people think of flash - as a way of taking photos in dark
places.
However, flash can also be used in bright locations
or in daylight to lighten shadows, reduce the harsh contrast of full sunlight
or brighten up dull images without being the primary light source for the
photo. This is called “fill-in flash,”
This is often a source of surprise for
non-photographers, who don’t expect to see photographers using flash units
outdoors on sunny days in brightly lit settings. In such situations the fill
flash is being used as a sort of portable reflector - shining a little extra
light in certain areas.
A typical example might be a person who’s wearing a
hat outdoors on a sunny day. Hat brims often cast dark shadows over the
subject’s face, and a little flash can lighten up this shadow nicely. A backlit
subject is another common use for fill flash - you can’t simply crank up the
exposure compensation to expose the subject correctly as then the background
lighting would be too strong. Or perhaps you want a little sparkle of light
reflecting back from a person’s eyes - the “catch light.” Sometimes wildlife
photographers use flash units at great distances from their quarry for the same
reason - they aren't using the flash to illuminate the animal but to provide a
lively catch light to the eyes.
In
conclusion:
In all these cases you are, from the point of view of
the camera, using two light sources at the same time. There’s ambient lighting,
which is all the available light around you - reflected light from the sun or
artificial light sources. And there’s the light from the flash unit, which is
supplementing this existing light. As always, ambient light levels hitting the
film or sensor are governed by the lens aperture and shutter speed and flash
levels are governed by flash metering. By adjusting the output of the flash
unit you’re essentially adjusting the ratio between flash-illuminated and
ambient light-illuminated scene.
In fact you could argue that the two cases I present
above - flash as primary light source and ambient light as primary light source
- are an artificial distinction and that all flash photography is fill photography
in a sense; just that in the first case the ambient lighting is so low as to be
insignificant, whereas in the second case it’s the reverse. This is true
enough, but I think the distinction is useful to make, particularly in terms of
the way full auto and P modes work versus Tv, Av and M modes.
Example Images
 |
Example of Fill-in-Flash from a recent wedding I shot,
the bride and groom would have been drastically underexposed had fill-in-flash
had not been deployed. Ian Meeson Photography
|
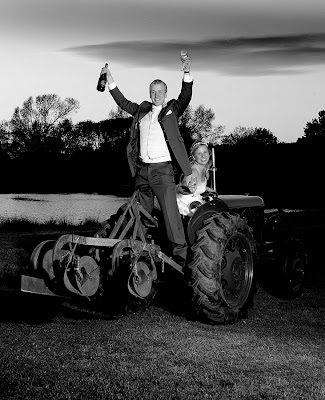 |
A
further wedding example of fill-in-flash deployed as the sun was setting.
Ian
Meeson Photography
|
Street
photography and Fill-in-Flash
This image was created under low light conditions
against a dark background. Opening up the camera to F3.5
ISO 200 and using the manual
setting on the Canon 580 ex set to 1/32 power and deploying the pull
out bounce card to direct a small amount of light to provide a catch light in
the eye and gently lift the facial features.
Ian Meeson Photography
Street
photography and Fill-in-Flash
This image was created under low light conditions against
a dark background. Opening up the camera to F2.8 ISO 400 and using the manual
setting on the Canon 580 ex set to 1/64th power and deploying the pull
out bounce card to direct a small amount of light to provide a catch light in
the eye and gently lift the facial features.
Ian Meeson Photography
IMAGE RESEARCH
Martin
Parr. His unique style does at first seem exaggerated with bright colours and
his shooting and framing are unusual. His imagery conveys humour originality
and are at most entertaining with an understanding of life. But also deliver a
direct visual recording on how we live, how we present ourselves to others, and
what we value.
.
Martin
shoots the English season of events for Tatler magazine.
A simple elegant image of an English gentleman
looking at his mobile. Well framed and lit beautifully and framed with the
crowd in the background, balanced with fill-in-flash, lifts the image to
display colour and tone.
Martin Parr
A
fashion shoot for the Italian biannual publication Grey Magazine
This image although a fashion shoot, displays
intimacy and could well be a mother and daughter, simply constructed,
demonstrating a subtle but effective use of flash.
Martin Parr
An image by Theo Sion, a perfect example of
fill-in-flash, demonstrating technical perfection and simplicity to produce a
striking real time image. The image creates depth and displays a pleasing
tonality and separation between the subject and the background.
 |
| Julie, February 29, 1994 a mother clutches her newborn baby to her bosom in front of the white walls of a hospital. |
Above two very different images by Dutch born photographer Rineke Dijkstra The use of fill-in-Flash is expertly used to perfection. The images are engaging and offer a contemporary take on the genre of portraiture. Her style is posed compositions with a clear distance between herself and her models in their often startled, confrontational expressions. Further study of the soldier, demonstrates careful positioning to use the sun as a short light, lighting source supported by fill flash.
Ian
Meeson Photography
The above image was created using fill-in-flash on
a dull afternoon. The cloud base was heavy and threatening to rain. A perfect
opportunity for an outdoor portrait.
Technique:
TTL metering for the sky and choosing a neutral
area and not the brightest part and under exposing by 2/3 rd.’s so not to
darken the background too much. The flash gun was hand held attached to a cold
shoe bracket that would support a translucent umbrella (light modifier) to
soften the light further.
Using the flash manual mode set to 1/8th
of its power an exposure was made. Overexposing slightly and the subtle use of
flash creates an aesthetically pleasing result creating a gentle butterfly
effect. In addition lifting the overall tonality and placing a catch light in
the eyes the lift the portrait.
Further consideration was the background,
producing a linear effect as the fence (camera left) and the housing (camera
right) create depth and perspective.
FLASH PHOTOGRAPHY
Further notes:
FLASHGUNS
Guide Number (GN) is
an indication of a flashguns power output and is based on ISO 100 film /
metres. The GN can be used to calculate
either, aperture setting on camera or maximum shooting distance, i.e. distance
from camera to subject.
·
E.g.
1 GN 40 40/f
8 = 5 metres
·
E.g.
2 GN 32 32/8metres = f 4
N.B. Doubling film
speed gives 50% more distance.
These guide numbers
are based on use of a flashgun in an average shape and size room in terms of
ceiling height, reflectance of walls and ceiling etc. If the flashgun is used in unusual conditions
e.g. potholing, these figures are inappropriate. These calculations are used
when pointing the flashgun directly at a subject and not bouncing light off a
ceiling etc.
The
camera shutter speed is dependant on the maximum flash synchronisation of 35mm SLR cameras having focal plane shutters. Medium
Format cameras have leaf shutters; therefore any speed may be used. Typical
flash synchronisation speed on modern 35mm SLR's
are 1/125 sec, with more expensive cameras having 1/250 sec. Any shutter speed
up to the camera’s maximum may be used depending upon the effect you are trying
to create.
The
slower the shutter speed the more ambient light will be recorded on film.
(Ambient
light is the light already existing in the scene you are photographing i.e.
daylight, street light etc).
SLOW SYNC. FLASH
A combination of a
blurred and sharp image can be obtained when photographing a moving subject and
happens if you use flash when there is ambient light around. As the burst of
flash may be 1/1000 sec. or less your subject continues to record on film for
the rest of the time the shutter is open.
FILL IN FLASH
The function of fill
in flash is to reduce the lighting ratio by adding illumination to the shadows
formed by existing light. Fill flash will also give catchlights to the eyes. A
good balance is usually a flash to ambient light ratio of 1:4 that is four
times more daylight than flash light.
Some flashguns will allow power outputs of 1:1, 1:2, 1:4, 1:8, 1:16
etc. This makes the task simple. Other guns have auto modes allowing a number
of different apertures to be selected for fill in flash. E.g. if the ambient
light reading is f 11 1/125, f 11 set on your gun gives 1:1 light
ratio. In order to lower the flash
output to achieve 1:4 ratio, set the flashgun to f 5.6. The gun thinks the lens is wider open than it is and gives
less light. In this way you can select
ratios of 1:2 f 8 or 1:8 f 4.
RED EYE
The flash being too
close to the axis of the lens causes Red eye. The light from the flash goes
straight into the subject’s eye and bounces back into the lens. The red colour is caused by the pigmentation
in the back of the eye. To correct it
you need to move the flash away from the lens axis. On cameras with an integral
flash this isn't possible. Try asking the subject to look away from the lens.
DEDICATED FLASH
Another version of
dedicated automatic electronic flash works in conjunction with many of the latest
model 35mm cameras. These are the
so-called dedicated systems. Dedicated
flash is designed to work with particular
model cameras, hence the name, and they provide one or more features beyond the
automatic exposure control provided by automatic, but not dedicated, equipment.
The most basic
dedicated systems automatically set the correct shutter speeds on the camera
when the flash is attached. They also provide a visual indicator in the
camera's viewfinder to signal when the flash has recycled and is ready to
fire. However, they still use the sensor
on the flash for exposure control.
In addition to these
two features, more sophisticated dedicated flash-camera combinations control
exposure through a sensor located behind the lens, inside the camera. Since such sensors read only the flash
illumination actually coming Through the Lens,
”TTL” flash systems
have particular advantages in close-up and multiple-flash photography, and when
using filters and very wide-angle and very long telephoto lenses. They also permit a greater choice of lens
apertures than do most automatic flash units that use a sensor on the flash.
Most through-the-lens
flash sensors actually read light reflected off the film's surface at the
instant of exposure. They are, therefore, often referred to as off-the-film or
OTF systems.
Dedicated flash units
are designed to work with a particular camera model, most (though not all)
dedicated flashes also have a sensor on the flash unit itself and can provide
automatic flash exposures with any camera when set properly. Similarly, any camera containing an internal
flash sensor and electronics designed for compatibility with a dedicated flash
can also be used with any non-dedicated automatic flash when set properly.
Using
Flash - This is a more tricky area for many people, even the more
experienced. There are probably more combinations and chances of things going
wrong here, than with any other type of lighting. It all depends on;
1.
Is your flashgun or Speedlight "dedicated" to your
camera?
2.
Does it have a full range of settings, including E-TTL (Canon), I-TTL
or D-TTL (Nikon) or full auto?
3.
Does it fit on the "hotshoe" or base of the camera?
4.
Does it have a bounce and swivel head?
5.
Does it have "Slave" capabilities?
6.
Does it have enough power?
In the
days of old when I first started in photography, I just had a fully manual SLR and fully manual flashgun with a complicated
chart I needed to use to get the exposure right. I guess if anything, it taught
me about the qualities and properties of light.
You
needed to work out the distance of your camera to the subject via the focussing
ring, check the table on the back of the flashgun and set the aperture
accordingly, all very time-consuming.
Then came
along flashguns with what was called a "Thyristor". This was a small
sensor at the front of the flashgun that would measure the amount of light
bouncing back from the subject at the point of exposure and immediately cut off
the flash's power leaving a well exposed image.
Nowadays,
the manufacturers have moved things on nicely with their fully integrated Speedlight
systems that work in conjunction with, and dedicated to your SLR/DSLR.
Using
Flash - Daylight/Fill-in Flash
You are
pretty much able to just set your camera up as normal with the settings you
desire and simply set the flash to auto. It will work with the camera and
"ping" just enough light to fill in the gaps using a modified version
of the "Thyristor" I mentioned earlier.
Try using
Av mode or aperture priority for fill in and just shoot as normal. Take a
reading from behind your subject, recompose and shoot. The fill-in flash will
take care of the main subject and your reading from behind will take care of
the background.
Using
Flash
It is
well worth practising with your own set up as once you get the hang of it, you
may well use flash for a lot more than just night or fill in shots.
I use the
above for flower shots to decrease the shadows and enhance the colours or for
pet shots to add some catch lights to their very dark eyes.
Using
Flash - Night/Indoor Flash
Not my
favourite of lighting as direct flash at night can leave the subject looking
"whitewashed" and cause some pretty horrendous shadows. Here are a
few tips for better flash photography;
Using
Flash - Increase the Aperture in Auto/Program mode
With some
DSLR's set to "program mode (P)" with auto or E-TTL flash, such as
the Canon EOS 20D or EOS 1D MKII, the camera automatically sets the shutter
speed to 60th/sec and the aperture to F4 and leaves the rest to the Speedlight.
If you
want to increase the depth of field by decreasing the aperture size, try this;
You want
to close the aperture for added depth of field and increase the
flashguns power to compensate and give out more light!
On your
DSLR, you should have a FEC (flash exposure compensation) button. This
allows you to increase or decrease the power output via an override to the
automatic system.
If you
want to decrease the aperture for more depth of field, you need to close
the aperture thereby letting in less light. To compensate, you must increase
the power output on the Speedlight.
I usually
close the aperture to around f6.7 or f8 and up the FEC by +2 or +3 stops. This
works quite nicely.
Using
Flash - Bounced Flash
The idea
behind bouncing the flash from another surface is to break up the intensity of
the light and diffuse it. Direct flash as we mentioned before tends to leave
harsh shadows, overpowering light and sometimes causes "red-eye".
If your Speedlight
is capable, and you are shooting indoors, try simply aiming the flash at the
ceiling and shooting that way.
Using
Flash
For
effective bounced flash lighting, remember these tips;
By
bouncing the light away from the subject, you are almost doubling the distance
that the light travels. This may cause the camera to underexpose slightly. If
it does you can either up the FEC +/- (flash exposure compensation) by 1 or 2
stops to increase the power output, or do the same with the camera's exposure
compensation to let in more light. Either option will allow for more light to
hit the subject thereby cancelling the effect of bouncing.
The angle
at which you bounce the flash is directly related to the distance of your
subject from the camera. For example, if your subject is a matter of 3 or 4
feet away, you need to aim the flash straight up. Anything else and the flash
will bounce straight over their head and hit the area behind them.
If they are on the other side of
a room, you need to angle the flash at about 45° so that it bounces from the
ceiling and onto them. To simplify it, imagine you are throwing a ball at the
ceiling at different angles, where will it land? That is where the flash light
will land.
This basic principle applies
also, if you are bouncing the flash from a wall or white card.
If your
flashgun has a second "fill in" flash bulb like the Metz CL-4, use
it. With both the bounced flash and fill-in flash, the effect is superb,
almost studio-like!
Using
Flash - Move the subject away from any walls
If you
just have to use direct flash, if possible, move your subject away from
any walls or large objects. This way you illuminate the person or object
without the nasty shadows in the background.
Using
Flash
In the
shot above, take a meter reading from the background knowing that the couple
would be well under-exposed. By pinging in a bit of flash, the whole scene was
well lit with no unsightly shadows. I made sure that anything in the background
was a long way off.
 |
Figure 1 Stand & Brolly
|
 |
Figure 2 Speedlight 580ex
|
 |
Figure 3 Cold Shoe
|
 |
Figure 4 Transmitter and receiver
|
Bibliography
http://www.photographymuseum.com/histsw.htm [Accessed
07/11/2013]
utileclothing.tumblr.com/post/.../utile-theo-sion-alice-charity-goddard
http://www.martinparr.com/recent-work/


.jpg)